How to Change The Color Of Something In a Picture
Adobe Photoshop is a photo editing software developed by Adobe. This software is suitable for any type of photo editing. Every graphic designer uses this software because in this software we edit all types of things in their photo.
For example, change the color of an object, remove the picture background, add or remove elements from a photo, and many more things that are easily editable in Photoshop.
This software has many versions and if you have installed the latest version then you have more options than the oldest version. I use the (CC) version to change the color of an object and I also recommend this software.
There are many people who have difficulty changing the color of an object. This is a big problem, but I will provide you with all the information you need to adjust the color of an image.
This is not a difficult thing. You easily change the color in 10 to 20 minutes using only a few options, and tricks.
The technique I will guide you through is the masking technique. I give you some steps which you need to apply to your image and then you will get the result.
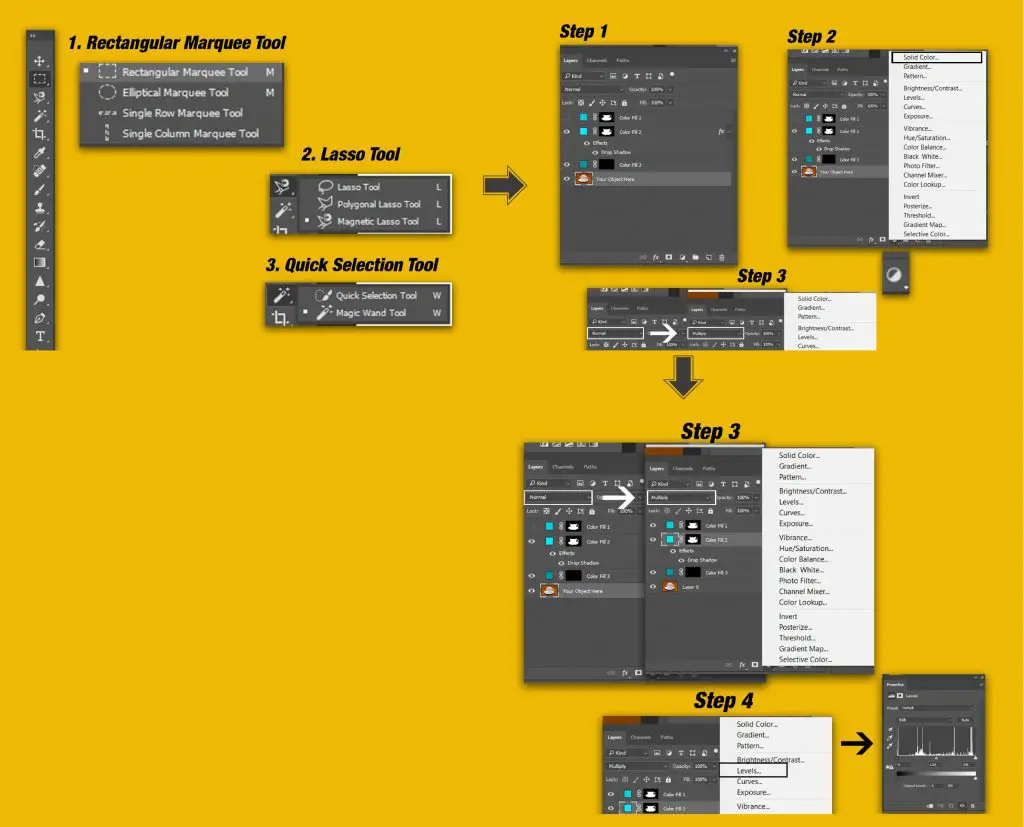
Step 1
The first step is to select the object from your image. This step is very significant because if you don’t choose the right thing you don’t get the correct result.
There are many selection tools to select any object and all tools have the same functionality.
The first group of tools for selecting the object is the rectangle marquee tool, Elliptical marquee tool, Single row marquee tool, and Single column marquee tool.
The second group of tools for selecting the object is the Lasso tool, Polygonal Lasso tool, and Magnetic Lasso tool.
The third group of tools for selecting the object is the Quick Selection tool, Magic wand tool.
The fourth tool for selecting an object is the Pen tool.
Above all tools are available in Photoshop in the toolbar section.
When it comes to making the correct selection, two tools are essential.
1: Pen tool (shortcut key P)
2: Quick selection tool (shortcut key SHIFT + W)
These are the two most reliable options for selecting anything from an image and I also recommend you to use these tools.
Step 2
If you want to deselect any selected objects, you need to click the Alt key and drag on those objects you do not wish to change the color of.
Step 3
When you select the image, you need to make a solid color and go on the layer section and click the blending option. Then you will see an option that is a solid color, click on it, and choose the color according to your requirements.
Step 4
Your image will not be clearly visible if the color and application you choose are not applied. To make them clearer, you will need to change the blending mode from normal to multiply and go to layers and then go to the layers tab where you see the image in a box (normal) and then this will be changed to multiply.
When this is done, you will see your image is clearer and more believable, but this is not the end, you need some other things to make them better.
Step 5
If you have completed the above steps, then you will need to make your image more professional. To do this, simply go to the layer section and then select the below-blending option.
When you choose them, you will see many options, but only levels. You click the level or by pressing the shortcut key (CTRL + L). When levels are visible, you create a level adjustment layer.
To adjust the color, click the midpoint slider and then use the handles according to your image.