How to Add Bullet Points In Illustrator
Illustrator is used to create professional-looking graphics. The graphic designers use this software and also recommend it to other people.
When people are creating graphics, they will face an issue that is that they aren’t familiar with bullet points in Illustrator.
People usually draw a small circle and align the circle, but this is the way they do it. This way, it takes more time and effort to create one bullet point in our text.
There are two ways to add bullets to your text and we share both methods. Then they can easily get a result if they follow our steps.
First Method
Step 1
The first thing we have to do is open our software. When we open the software, we need to write any text in separate lines. When we write the text, we need to go to the upper-right corner and click on (Type).
Step 2
After clicking the “type” button, we see many options. The option we need is (Glyphs) and we need to click on (Glyphs).
Step 3
When we click the Glyphs box appears near the artboard side. All bullets in the box apply to our text, and the bullets in the box are easily applicable.
Step 4
Now we are ready to select any bullet. We select the round bullet and then we double select our text. When we double-click the text the mouse cursor is blinking. We need to click on that text to make it bulleted. We highlight the text at that place where our line started.
Step 5
We click the text and our mouse cursor blinks, then we choose our bullet and double click the bullet. In the following picture, we see that our bullet has been applied, and we need to select every single line to bullet them.
The color you choose in your bullet will be the same as your text color.
The first one has been completed, and this is to everyone’s benefit. Designers add point dots using this method and most people use this method.
Some people have difficulty using this method because they have more lines and it takes a long time to edit their text.
Now we share the second method for those people who have a lot of text and the second method is slightly easier than the second method.
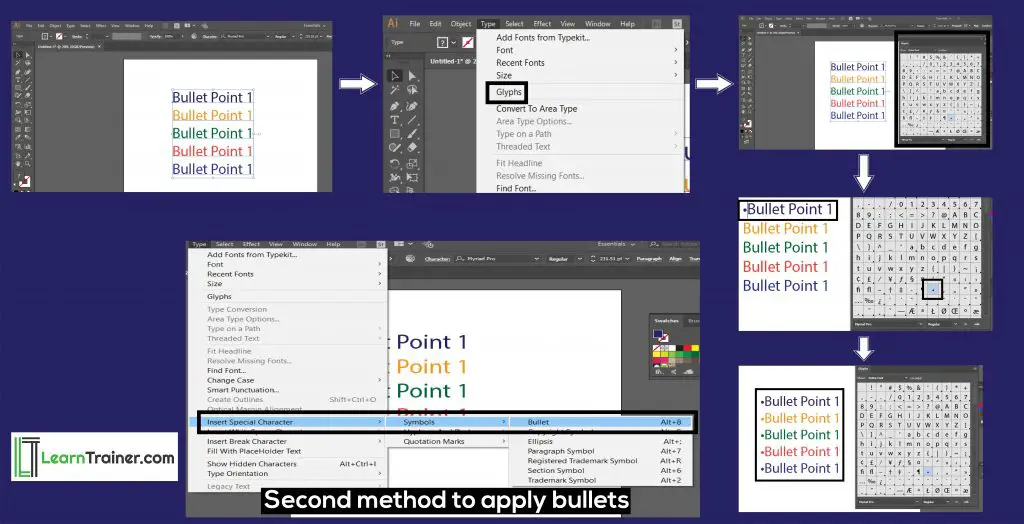
Second Method
In the second method, we follow them in one step. They need to type the text and then we see the upper side (Type) is written.
When we click the (Type) then we will have many options but we will have to click down and click on (Insert Special Character) and when we click them then we find the box is open.
In the box, we see three things are written but we need the first thing which is (Symbols). As soon as we click the button, another box appears with many options, but we only have to select the first (bullets) or use the shortcut key (Ctrl 8).
When we click on them, a bullet is added to our text.
When adding more than one bullet, we need to use the second method and click the text, then use the shortcut key (Ctrl 8) and our bullet is applied.
We think that your problem is solved and now you will easily complete your work using our techniques.